Sunday, November 28, 2010

Finishing & Organization


So, thar’ she is!  Up on the wall and tarted up with snazzy handles (on sale at Lowe’s!) Cooler than any garage cabinet has a right to be.  Speaking of Lowe’s – who would have thought that they would have GREY peg board!   I stopped and stared in the aisle – it was like the heavens had opened up and ray of sunlight burst through. FINALLY!  Somebody understands my needs at a big box retailer.  (For the sake of brevity, I’ve left out a very long story of firing Home Depot and Lowe’s multiple times over the course of this project for failing to have shelves stocked with supplies I needed.  Basic supplies.  I can buy a Mexican Coke but you can’t stock 12” white melamine with pre-drilled holes at every store, Home Depot? What the hell is that? Sorry, done ranting….)

Grey f’in peg board!  Hot damn.


My New Garage Cabinets


Doors & Organizers

Because we kept to the 4’ height, we got two doors out of each 8’ melamine board. Your local big box retailer will have a little kit to set up your hinges and get them drilled correctly. Buy it.  You won’t be sorry.

I left the inside of the cabinet white to help with visibility.  We have plenty of lights on the work table, but it gets dim as you look upward, so the white helps bounce light out of the cabinet.  Under the cabinet, we put in an LED undercabinet light strip.  In our zeal to organize things, we even took advantage of unused real estate in the corner and turned it into shelving for drill batteries. 

The Pièce de résistance of my new garage cabinet is the bins. 

Where before there was chaos and madness, nothing could be found and we bought things twice because we couldn’t find the first one.  We never knew exactly what we had.  Then came the bins, and they changed…..everything.  

Really, when you come right down to it, it was always about the bins. You know that TV commercial where the couple asks the architect to design a house around a faucet?  Well, we built a cabinet around some bins.  It is the plain, honest truth.


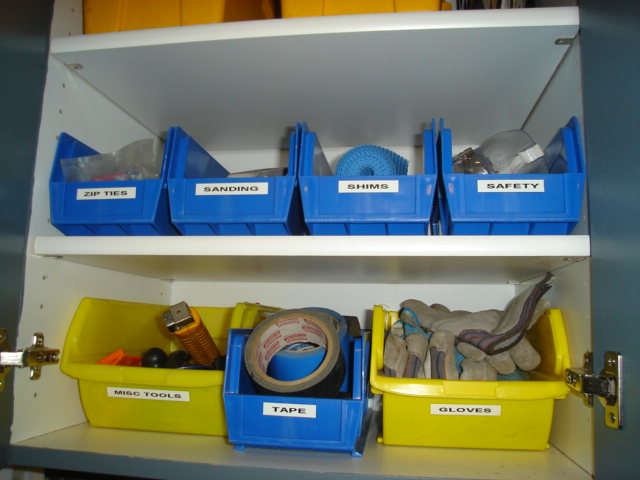
Plastic Bins Now Organize the Garage Cabinets
So, knowing that our cabinet inside sections were around 22” deep, I needed to find bins that would maximize the depth of the cabinet.  I think we’ve established by now that I research things to death, no?  Anyway, finding companies who want to see you a wide variety of bins individually is not easy.  I found only one manufacturer that met my bin needs in terms of size, Quantum Storage Systems.  I ordered blue bins that were 14 ¾ deep, the fit perfectly on my 16” shelves.  I grabbed larger yellow bins for stuff that needed a bigger bin, like gardening gloves.  (Just because I know somebody is going to want to know this: www.randmh.com was one of the few companies I found who had a full range of bin sizes and would ship individually, rather than packs.)

All the sandpaper ended up being stored in a magazine holder, available at any office supply store.  Works great.

We also put plastic bumpers on the inside of all the doors so minimize damage to the cabinet over time.

The final phase of this project is the shelving to the side, the subject of the next post.

Monday, November 22, 2010

Assembly and Installation


Assembly and installation took place on two different days.  We’re in our late 40’s here, so we move a little slower on projects now than back when we were tearing siding off the house without a care in the world a mere 6 years ago.  

Once we had stripped the wall of the old crates, we had nice blank wall to work with!

Our blank wall in the garage - ready for a cabinet!

We had designed our cabinet in 3D using Second Life, so we knew all our cuts and exactly how things needed to lay out.  We planned the cabinet to stay as close to cut sizes so as to minimize unused resources.  Our design was for a 6’ wide by 4’ high cabinet that would be broken up into 3 sections. Two sections would get doors and one section would be open for tool cases to slide in and out, we called that section “the cubby.”  4’ was pretty tall, but that allowed us to get two upright pieces from an 8’ section with no waste.  The end pieces from our top and bottom of the cabinet were (2) 6’ pieces and the 2’ sections left over became shelves for the cubby.  No waste.   The backing board did leave a 2’ segment, but I’ll find a use for that, somewhere! 

I wanted 16” shelving everywhere it was possible, this area stores a lot of big and bulky items and 12” shelves were just not going to cut it.  So, the depth on the main cabinet is 16” and on the side shelves we had to go with 12” to accommodate the swing of the door. 

It’s a big damn cabinet.  

We built it down on the ground in front of the garage and lifted it up to the workbench in stages.  We had fixed 2x4’s to the walls on 2 sides for support beneath, then secured from the top and other side with brackets.  The final push to get the cabinet from the work bench up onto the brackets was a little ugly, but we did it.  

Note to self: add a garage winch system into dream home plans....

Cabinet base installed
 Next we will add the doors, do a paint touch up and start organizing the work station.  Yippee!

Thursday, November 18, 2010

Painting Melamine Cabinets


So, after the decision was made to paint, the question became about paints that will be good for covering melamine.  I heard wind of something called Cabinet Coat.  Couldn’t find it anywhere.  Then I heard Home Depot has some kind of cabinet paint that would cover melamine perfectly, the paint team at Homer had no clue about this product when I asked.  

FINALLY.  I found Cabinet Coat at Ace Hardware.  Only they didn’t stock it at the one I first checked at – but they could special order.  The kicker was, it wasn’t really tintable to the degree I wanted for “garage grey.”  Then, wonder of wonders, I find that Ace makes a cabinet and door paint that IS tintable with a Deep Base. Huzzah!   

We had to call around to some of the larger Ace franchises to find one that had Ace Cabinet, Door & Trim Paint in the Deep Base (Sku 1320654).  Happily, a location nearby had it on the shelf.  And thus we were off to the cabinet building races.

Ace Cabinet, Door & Trim Paint

My only real regret was that I failed to follow good painting technique and blew off sanding and priming.  I suspect I would have gotten a tougher finish that was more resistant to scratching, but I just wasn’t willing to go that level of prep for garage cabinets.    

I also made the mistake of following advice on the internet to use a foam roller.  This = big mistake.  The foam left all sorts of bubbles in the paint.   

Horrendous idea.   

Had to sand the cabinet doors back down and repaint them.  The correct roller is a traditional roller designed for ultra-smooth surfaces.  A paint team member at Lowe’s suggested a 6” roller for adhesives as a good choice.  This roller delivered a much better finish.  Grey over white needed two coats. Almost all the pieces needed a little touch up after cabinet assembly and installation.  I’ll post back over time with reports of how the paint holds up over long term use. 

**11/28/13**
I have a favorable report on how the paint holds up. It's been 3 years and the cabinets still look great.

Funny story...I decided to add another cabinet in the garage and as I was about to start painting I found myself blank as to what I'd done on the first cabinets. Did I sand? Did I prime?

So, I went looking for one of the blog posts that I had used as a resource three years ago on painting melamine. Didn't find that blog post, but I did find THIS one (you're reading right now) where I specified what I had done. I just had to laugh.
I answered my own question by documenting the project on my blog....

Wednesday, November 17, 2010

The Garage Cabinet Project

The first project I’m going to profile is the latest disrepair inflicted on my homestead: Garage Cabinets. 

The more home improvement I do, the clearer it has become that a well-organized and decently stocked workshop is a must.  We’ve been making do with a less-than ideal arrangement put in place by one of the previous owners of this fine, Southern California residence.  The original shelves were not actually shelves, but shipping crates sent to American Wholesale Hardware, Co.  I’m guessing that a previous owner of the house worked there, hence the elaborate shipping crate storage system along the walls.

The garage shelves BEFORE. Yikes.
 
Needless to say, this might have been fine for someone not using the garage as a workshop.  For me, they had to go.

So, the mission was to pull out all old crates and makeshift shelving and build in cabinets that were designed for the tools, supplies and other miscellaneous gack that accumulates in this spot in the garage. I optimistically assumed I could buy some prefab cabinets, pop them together, slap them up on the wall, and be done.  

Foolish girl.  I should have known nothing so easy had the remotest chance of occurring.  

I started my journey to proper garage shelves where all home improvement journeys start: trips to Home Depot, Lowe's, and OSH.  Everybody had WHITE melamine cabinets. The few cabinets that were proper garage-gray were really …..well, butch.  I wanted a garage workshop, not a NASCAR maintenance pit. Internet research revealed a whole lot more WHITE utility cabinets. And not even in sizes that made sense for what I wanted, so obviously we were going to build these cabinets from scratch. 
 
Once the decision had been made to build the garage cabinets custom, the project narrowed down to supplies.  Most of the big box home improvement stores had prefab sheets of 4’x8’, 16”x8’ and 12”x8' – even with shelf peg holes pre-drilled.  Except it was all in WHITE. Feh. 

Fast forward to the local specialty lumber store, where I’ve gone to ask about custom ordering gray melamine. They tell me that special ordering gray melamine would be prohibitively expensive; using a special cabinet paint tinted gray would be a better solution. And thus, it came to pass that the cabinets would be painted gray.  In my next post, we will move on to the scintillating topic of cabinet painting.